Posts

Showing posts from March, 2012

Tim Holtz' Creative Chemistry 101 Day 5

Image
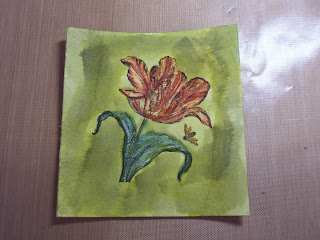
This online course is 10 days long and I've just completed Day 5.  The techniques from Day 5 are beautiful and I can't wait to get started on some cards and collages that I hope to actually frame.  I'm learning techniques that produce items that are worth to be given as gifts and every once in a while, something happens that I think would sell.  I'm not looking to become a mass producer of cards and whatnot, but if I have an outlet I certainly have added some tricks to my repertoire.  So, on to the reveal! Stained Kraft Resist technique This technique uses Tim Holtz' Kraft paper which is covered with a varnish in places. The varnished areas will resist add color (water based) so I can saturate the page, wipe away excess, and the varnished areas will come back through. Stamping with Stains technique I have a new favorite tool called Picket Fence. It is a heavily pigmented white stain that dries to look like white wash.  It adds a bit of Oomph to a piece.  It

Tim Holtz' Creative Chemistry 101 Day 4

Image
So today's entry will have two projects instead of three.  One issue I have with this course, is that we were given a supply list and a suggested supply list from which I purchased my, well, supplies.  However, there have been a couple of projects which relied on items that were not on either list.  I tried to make do, but today's third project (making a custom stamp pad out of specialty felt) was impossible to fudge on.  I have so many stamp pads that it doesn't make sense to go out and buy the felt for one project. So, here are today's projects.  The first one used waterbrushes (plastic tubes filled with water that have brushes on the end) to watercolor stamped images with re-inker.  For those who do not know, a re-inker is a very concentrated form of ink used to renew a stamp pad.  I only have two re-inkers so I took a little license and used my markers to add highlights.  I really like this technique and the look I achieved! Watercoloring with Re-inkers tech

Tim Holtz' Creative Chemistry 101 Day 3

Image
Today's techniques were a little more challenging for me.  Mostly because I did not have the correct tools for the project.  One item that I must have missed on the supply list was Glossy stamping paper.  Tonight I discovered why glossy photo paper is not a good substitute...it lacks the clay coating of the stamping paper which makes it impervious to the solvents in the alcohol inks I used.  Still, I think it turned out well even though I ruined three or four 'first tries' getting it down.  So, without further ado, here is technique #1: Alcohol Ink Agates I had so much fun doing technique #2, Archival Resist. A solvent ink and a water-based ink will repel each other so I can stamp with one (solvent) then coat the paper with the other (water-based) and when I give it a wipe, the first layer shines through.  I really love how this piece turned out! My final technique taught me some new ways to use my texture fade folders.  These are embossing folders that are ran th

Tim Holtz' Creative Chemistry 101 Day 2

Image
Tim Holtz is my favorite mixed media artist and he is offering an online course designed to teach us techniques using his line of Ranger products.  These products include Distress Ink pads, Distress markers, different Stickles (kind of like glue with glitter in it), as well as different Ranger tools. It is a self-paced course taught through very informative videos. I fell a little behind so even though it is Day 3, I just completed Day 2's exercises.  For the next two weeks, I'll be sharing my finished products on this blog.  I would share all the techniques but that wouldn't be fair to those who paid the $35 for the course!  If you are interested in signing up for the class, I think you can still do it at http://www.onlinecardclasses.com/timholtz/class-info/.  Now for today's projects: Blended Distress/Spritz & Flick technique Brushless Watercolor technique Wrinkle-Free Distress technique Composite of Day 2 techniques (I'll call this my Dar

Doing Sunday Breakfast the Right Way

Image
I always loved waking up on Sunday morning and realizing that I had a full day with nothing scheduled to do.  My first thought was inviting Andy and Jaycee to go with me to Cracker Barrel but now that I'm living on a retiree's allotment, spending money on a restaurant meal takes prior planning. Fortunately, I know that I can make a breakfast just as good as Cracker Barrel (and I know the quality of my ingredients).  Therefore, today I fixed a traditional breakfast for my family.  It may have not been the healthiest meal, but it sure was good! Roasted Herb and Garlic potatoes I used Yukon Gold, Banana and French fingerlings, and Baby Blue potatoes tossed with olive oil, parsley, garlic, thyme, sage, and rosemary. A colorful meal (This was Andy's rasher of bacon!) Take time to enjoy a meal with your family.  It will be the best thing you do all week.

Breakfast on the run

Image
I've been running a little behind since Daylight Saving Time started last week.  Because I have been staying in bed a little longer, I've not been fixing my breakfast and lunch to take with me to school.  This hits me where it hurts...in the pocketbook because I purchase food at the local cafeteria and it costs me between $7 and $13 per day.  Add this to $9 for parking and 54 round-trip commuting miles and a school day can be expensive!  Today I have committed to being prepared and fixing my food.  This is a cost I can control.  I have a George Foreman 5th Generation grill which has several different plates for cooking.  One is an omelet maker so I made sweet pepper omelets with Mexican cheese and fresh thyme.  To accompany the omelet, I'm having Greek yogurt with raspberries, honey, cinnamon, and fresh lemon thyme.  A meal that would cost several dollars in a restaurant for pennies. I don't have a photo of lunch, but I fixed a baked potato, leftover roast beef, a